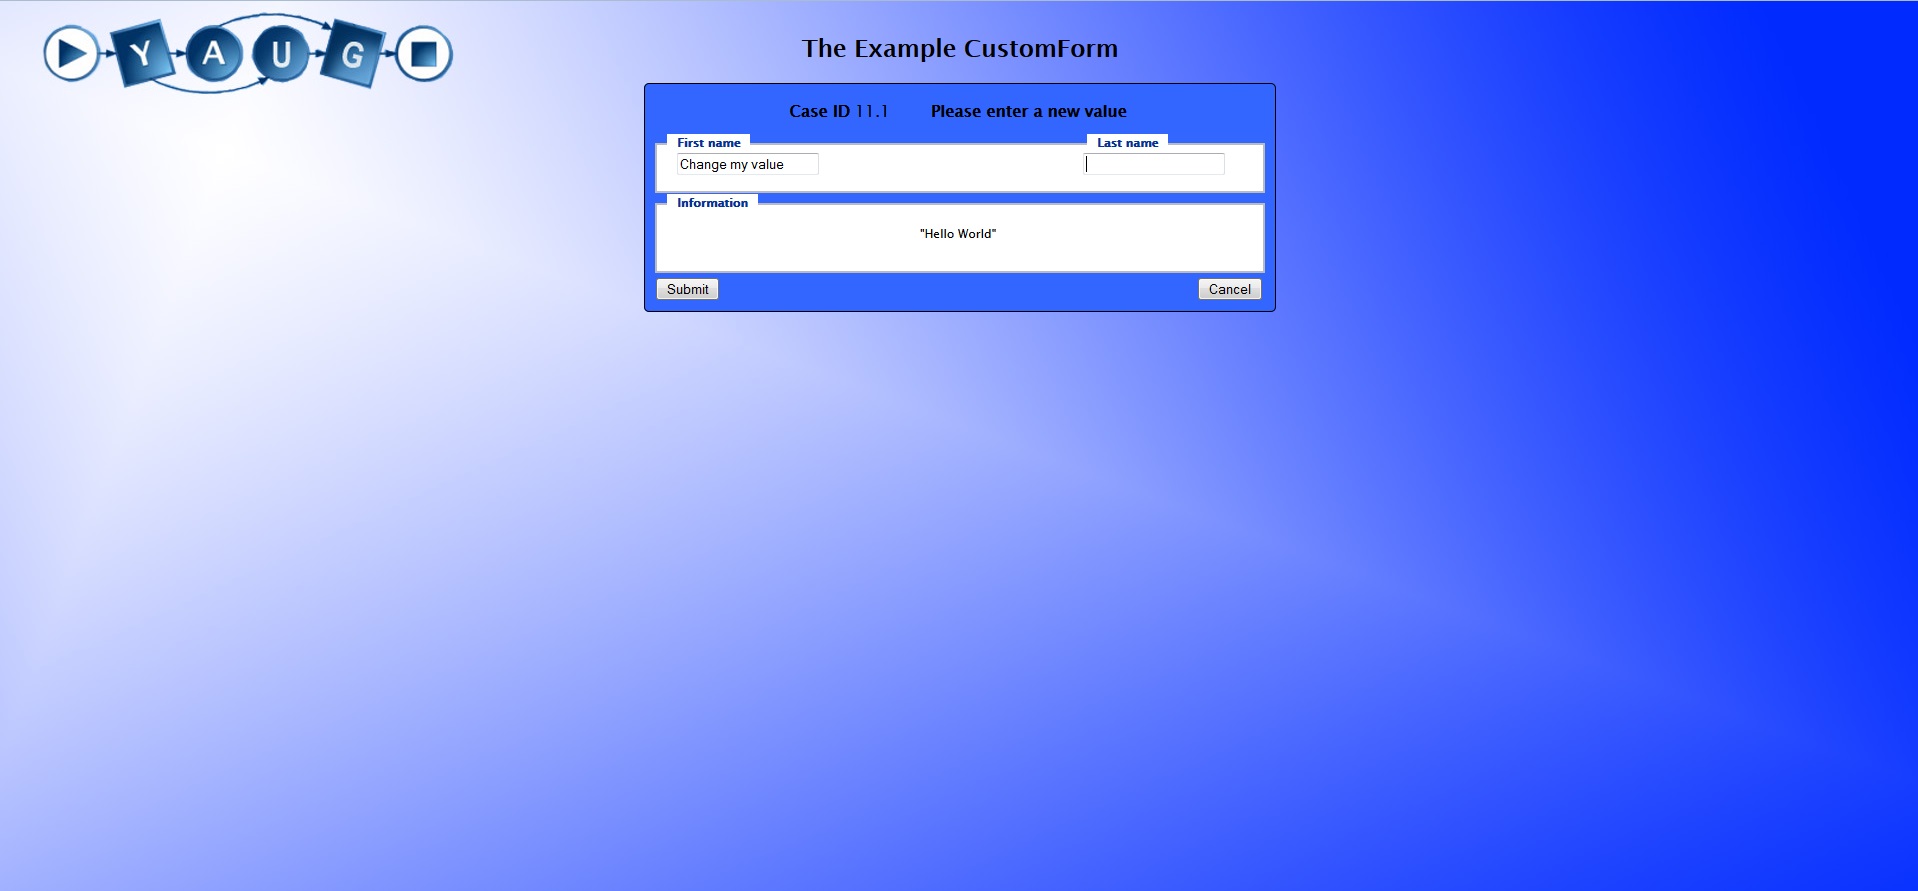
Result of this tutorial:

Introduction
This tutorial should help you to create a custom form.
At first what you need is the YAWL Engine and you need a little bit of knowledge about HTML, Java and JSP.
Preparation
At first we begin with the example of a custom form and with a workflow for integration.
All necessary files are located in the customform folder .
The first step is that you have one participant in your resource service. You can use your own participant or you create a new one.
The second step is to import the folder “transFormer” at the following folder at your YAWL Engine “…/YAWL4Study/engine/apache-tomcat-7.0.52/webapps”.
Later we will give you an explanation of the file “customformexample.jsp“.
The third and last step is to upload the specification “Custom_form.yawl” to your YAWL Engine.
Workflow
Now let’s take a look at the workflow

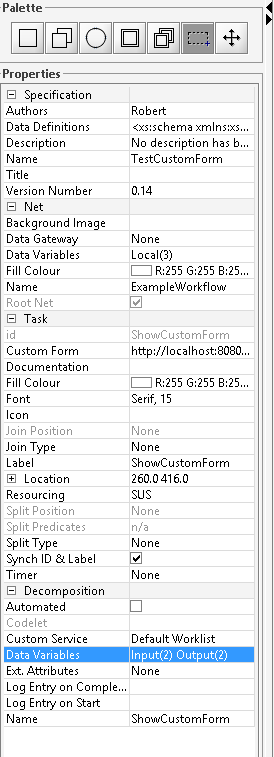
This workflow has two tasks. The first task “ShowCustomForm” has three task variables that are displayed in a custom form.

Now you have to set the destination of your custom form. In our example the location of the custom form is on the apache server of the yawl engine.
The adress of our custom form jsp-file is http://localhost:8080/transFormer/customformexample.jsp.
If you want to access the custom form from another system, then you have to change the adress to your ip-adress of your computer.

The next task “PrintValues” shows that the values are in the task “ShowCustomForm” now and the custom form really works.
Creating a custom form
The first step with the workflow is done now, we take a look at the creation of a custom form. In our example it's the file “customformexample.jsp”
To create a custom form, it is useful to use a development environment. In our example we use the development environment “Eclipse”.
Excursion to eclipse
At first we take a little excursion in creating a project in eclipse, because if you create only a jsp-file “Eclipse” doesn’t know many of your code commands.
At first we create a java project named “CustomForm” and create in the folder “src” a jsp-file named “customformexample.jsp” and we don’t use a jsp-template.
To prepare the project we right-click on the folder “JRE System-Library” select “Build Path”->”Configure Build Path”.
At the tab “Libraries”, there is a button “Add External JARs…”. Click on that and select “.../YAWL4Study-3.0beta/editor/YAWLEditor3.0beta.jar”.
Now the library of the YAWL Editor is imported to the project.
Back to the development of the custom form
Now let’s write the code “customformexample.jsp”.
Our first thing is the java code, after that we create the HTML Form, which will show to the end-user.
In order to access the java classes, we import this.
|
<%@ page import="org.jdom2.Element"%> <%@ page import="org.yawlfoundation.yawl.resourcing.rsInterface.WorkQueueGatewayClient"%> <%@ page import="org.jdom2.output.XMLOutputter"%> <%@ page import="org.jdom2.output.Format"%> <%@ page import="org.jdom2.input.SAXBuilder"%> |
Getting back, when ready we set the redirect URL.
|
String redirectURL = (String) session.getAttribute("redirectURL"); if (redirectURL == null) { redirectURL = request.getParameter("source"); session.setAttribute("redirectURL", redirectURL); } |
If the cancel button has been clicked on the HTML form, we clean up any session attributes which are be set, then return to the worklist.
|
String submit = request.getParameter("submit"); if ((submit != null) && (submit.equals("Cancel"))) { session.removeAttribute("itemXML"); session.removeAttribute("workitem"); session.removeAttribute("handle"); session.removeAttribute("redirectURL");
response.sendRedirect(response.encodeURL(redirectURL)); return; } |
To retrieve the workitem data’s as xml, we use a workqueue gateway client object. The url is the default value, if you use the apache server of the YAWL Server.
If you use another apache you have to place the “YResourceServiceClient.jar” at the same location.
|
String wqURL = "http://localhost:8080/resourceService/workqueuegateway"; WorkQueueGatewayClient wqClient = new WorkQueueGatewayClient(wqURL); |
If the form has refreshed, it will be stored in a session.
|
String itemXML = (String) session.getAttribute("itemXML"); |
If the form is not refreshed, it gets the xml from the gateway. For that we get the workitem id from the request and the user. In the following we set the variables "itemid" and "handle".
The itemXML contains the data of the work item and we save the three variables in a session, if the form would be refreshed.
|
if (itemXML == null) { String itemid = request.getParameter("workitem"); String handle = request.getParameter("handle");
itemXML = wqClient.getWorkItem(itemid, handle); session.setAttribute("itemXML", itemXML); session.setAttribute("workitem", itemid); session.setAttribute("handle", handle); } |
Now, we take a look in our example workflow, what we get in the itemXML to understand and what we have to do next.
|
<workItemRecord> <id>29.1:ShowCustomForm</id> <specversion>0.11</specversion> <specuri>TestCustomForm</specuri> <caseid>29.1</caseid> <taskid>ShowCustomForm</taskid> <uniqueid>0000000000000000000000004</uniqueid> <taskname>ShowCustomForm</taskname> <documentation></documentation> <allowsdynamiccreation>false</allowsdynamiccreation> <requiresmanualresourcing>true</requiresmanualresourcing> <codelet></codelet> <deferredChoiceGroupid/> <enablementTime>Apr:22, 2014 18:00:32</enablementTime> <firingTime>Apr:22, 2014 18:00:42</firingTime> <startTime>Apr:22, 2014 8:00:42</startTime> <completionTime/> <enablementTimeMs>1398182432267</enablementTimeMs> <firingTimeMs>1398182442892</firingTimeMs> <startTimeMs>1398182442902</startTimeMs> <completionTimeMs/><timertrigger/> <timerexpiry/> <status>Executing</status> <startedBy>admin</startedBy> <completedBy/><tag/> <specidentifier>UID_d89a831b-b84e-4a33-8fce-bfcfa4083b87</specidentifier> <data> <ShowCustomForm> <var>Change my value</var> <var2>Hello World</var2> </ShowCustomForm> </data> <updateddata></updateddata> </workItemRecord> |
We see above, we get the “workItemRecord” with many elements, which we can show at our HTML Form for example “id”,”caseid”,”tasked”,...
We see blue coloured the element “data” that contains the element “var” and “var2”. That’s our variables which are from the scope “InputOutput” and “Input”.
Our “var3” is from scope “Output” that’s the reason why we don’t see it as an element. We don’t use it in our example, but the element “updateddata” contains the saved values, if you implement a save button in your custom form.
Back to the code. Now we have seen above the content of “itemXML” and we have to prepare them with JDOM. We create three objects from type Element. “wir” contains all element from the root level from “id”,”caseid”.
If an save button exists, "updatedData" contains elements. “data” checks updatedData contains content, if that set them as content for the form or set the element “data”.
|
Element wir = new SAXBuilder().build(new StringReader(itemXML)).getRootElement(); Element updatedData = wir.getChild("updateddata"); Element data = (updatedData.getContentSize() > 0) ? updatedData : wir.getChild("data"); |
Next we go one level down from element data this element we define as wirData.
|
Element wirData = data.getChildren().get(0); |
If the itemXML contains an error, we have to check it and put out an error message.
|
String error = null; if (!wqClient.successful(itemXML)) { // show the message to the user in an appropriate way. In this case, we'll // simply show it on the form below error = itemXML; } |
If the itemXML is checked, then we use the else statement. In the else item we put our individual code which is in every custom form fitted to the variables of the task.
At first we read the new values as entered on the HTML form and save it in variables and then we define the names from our variables of the task, which was be modelled in “YAWL Editor”
|
else { String var_input = request.getParameter("var_input"); String var2_input = request.getParameter("var_input2"); String varName = "var"; //The value with input and output String varName3 = "var3"; //The value with only output |
Then we check it. If the values of “var-input” and “var2_input” are not null and in another then we check, if the element “wirData” is not null. In that statement we define our updated Element.
In our “itemXML” example, we see that the variable “var3” is missing, so that we have the create as node.
Important! Here we have to hold the order which is defined in YAWL Editor, that’s the reason why we define the output in the editor at last and saved us a sorting of the element “wirData”.
Now the new Element we have to add to “wirData”. After that we check in, if the statement “dataitem” is not null and set the text of the variable “var” and also check if “dataitem2” is not null and set the text of the variable “var3”.
|
if (var_input != null && var2_input !=null ) { if (wirData != null) { Element dataitem = wirData.getChild(varName); // get data var Element dataitem2 = new Element(varName3); //creating the node for var3 wirData.addContent(dataitem2); if (dataitem != null) { dataitem.setText(var_input); // update data var's value if (dataitem2 != null) { dataitem2.setText(var2_input); |
The workitem has to be updated via the gateway, with the new values. After that we check, if the update via the gateway was successful and remove the session and redirect.
|
String itemid = (String) session.getAttribute("workitem"); String handle = (String) session.getAttribute("handle"); String dataString = new XMLOutputter(Format.getCompactFormat()).outputString(wirData); String result = wqClient.updateWorkItemData(itemid, dataString, handle);
// check all is ok - if so, close the form if (wqClient.successful(result)) {
// clean up our stored session attributes session.removeAttribute("itemXML"); session.removeAttribute("workitem"); session.removeAttribute("handle"); session.removeAttribute("redirectURL");
// now we can redirect back to the worklist. // if you want the workitem to complete when it posts back, add // the parameter below and set it to 'true'; if it's false or // missing, the workitem will update but remain on the worklist's // 'started' queue (a 'save') redirectURL += "?complete=true"; response.sendRedirect(response.encodeURL(redirectURL)); } else { error = result; }//closing if(dataitem !=null) |
At last we close the last 'if' and give them else statements.
|
//This else condition gives a feedback if the varName3 is null } else { error = "This workitem does not contain a variable called '" + varName3 + "'."; } //This else condition gives a feedback if the varName3 is null } else { error = "This workitem does not contain a variable called '" + varName + "'."; } } else { error = "This workitem does not contain any data for updating."; } } } |
HTML Code
Finally, for the web layout we need the html code. Per html it's possible to set the workitem page to their wish.
For each work item page that has same layout, you can implement a css-file in the html code.
In the following, we declare the HTML code and at which point we can implement the css-file.
HTML code first part
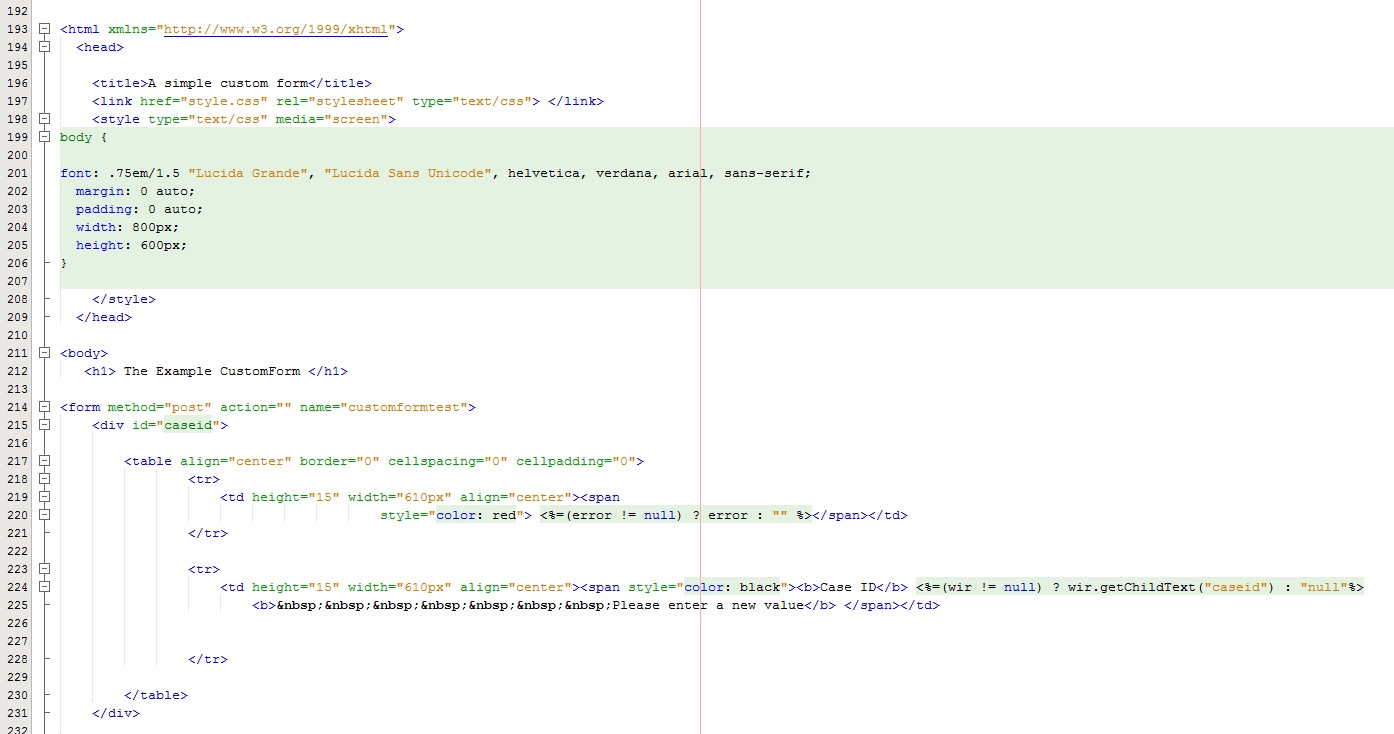
At first we determine the title of the html document. This is displayed only on the edge of the browser. Directly under the <title>, we integrate the link to our "style.css" document.
In order for our html-code can retrieve the settings of the css-document now.
After the <head> part, we start with the <body> for set the specific website structure.
In our example, we use the html command <h1> for our headline.
So that the html code assigned to the settings in the css file, we assign for each pattern piece a fixed id.
The css file references namely to the id. After the header, we want to show the case id and a work instruction. For this we create a table with <table> ( for more variety of our commands).
The the first row <tr> should show the output of Error, if there is one. In the second row comes the work instruction. The command is used to get a space command.
In the <td> command can you set the width heigth and align for the specific column.

HTML code second part
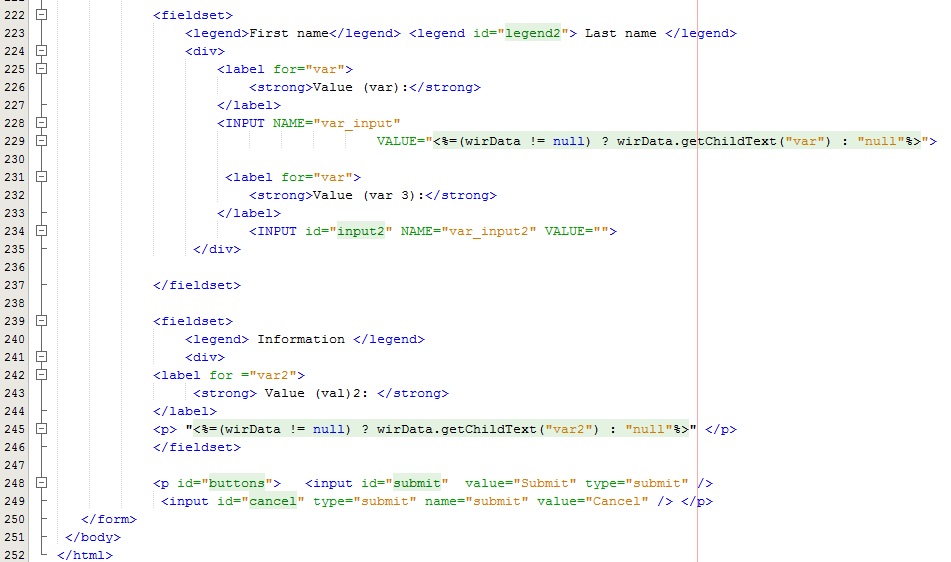
As next, we divide the parameters into two fields with command <fieldset> . The input values are placed in the first field and the retrieved values in the second field .
The fields we can declare individually with the <legend> command.
In order to address the individual variables in the rows, we use the command <label>( In this example, we disabled the labels and use the legends for a fictitious example layout). With a unique label or an id, is the variable area for the css-file clearly identifiable.
After both fields, we implement the save and cancel buttons. For that we need the <input> command with the type of "submit".

If you have further questions, feel free to comment.
(Notice: This tutorial was created with build version 3.0beta.)
